Mac Evaluation Utility: What It's Good For, How to Use It
 Kandji Team
The Mac Evaluation Utility (MEU) started out as an informal collection of scripts that Apple engineers and consultants would use to evaluate client environments, to see if they were ready for the deployment of Apple devices. Those scripts would check things like local device settings, network configurations, and the accessibility of Apple services, looking for anything that might pose problems for that deployment.
Eventually, those scripts were collected and given a nice GUI and a name: the Mac Evaluation Utility. IT departments deploying Apple devices could use MEU themselves, to check for any barriers to deployment as well as to troubleshoot existing installations. (You have to be a member of the AppleSeed for IT program to download it—which means anyone with an Apple Business Manager account.)
Apple recently released version 4.5 of MEU. It includes an improved interface, making it easier to run reports and to control which tests are run. It adds tests for secure tokens and bootstrap tokens, volume ownership, and iCloud FileVault Recovery. It supports PDF and JSON formats (in addition to CSV) for exporting test results. And it improves performance; you can now run the whole test suite in as little as 5 seconds.
What Is the Mac Evaluation Utility?
It’s called the Mac Evaluation Utility because it has to run on a Mac, but much of what it's evaluating is relevant to all Apple devices. After downloading MEU, you install it on representative Mac endpoints in your environment. “Representative” means that the test Mac is configured similarly to and shares a location or network segment with other devices you want to evaluate. If you have multiple locations or multiple network configurations in a single location, you’ll want to install an instance of MEU for each of them. (Alternatively, you could install MEU on a single laptop that you then take around to each of those locations in turn.)
If you already have a set of test devices installed in your organization, then you can deploy MEU there on those. It doesn't hurt to have reports from two or three different devices in the same area. What you want to avoid is generating reports from dozens of different devices; sifting through all those results probably isn’t worth it.
How to Use the Mac Evaluation Utility
Once you’ve installed the MEU, you click the Play button to run your first report. If you’d like more focused results, you can first review the list of tests and select only those you want to enable. When you select a given test, you’ll see a description of what it does and, in some cases, the actual shell commands it runs in a sidebar on the right.
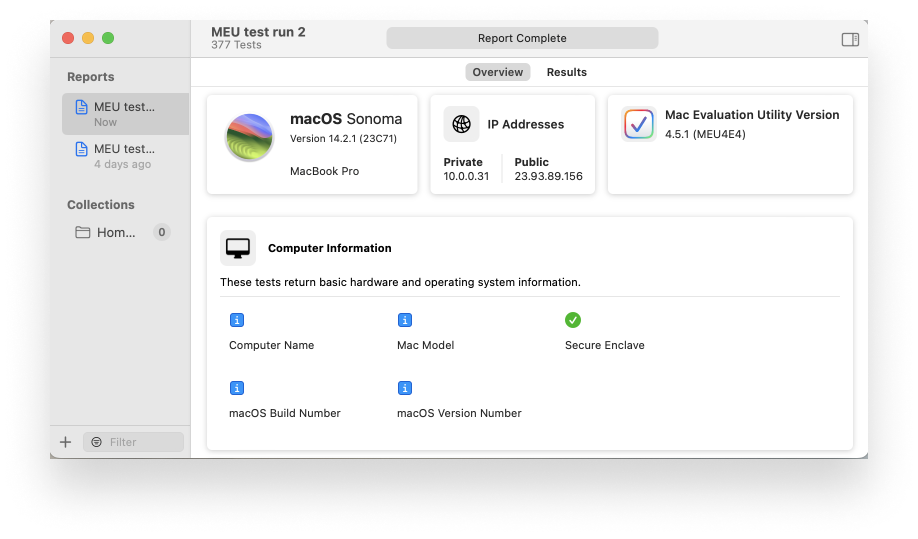
After you hit Play, MEU will take roughly a minute to compile its results. There’s an Overview tab showing you those results in broad categories.

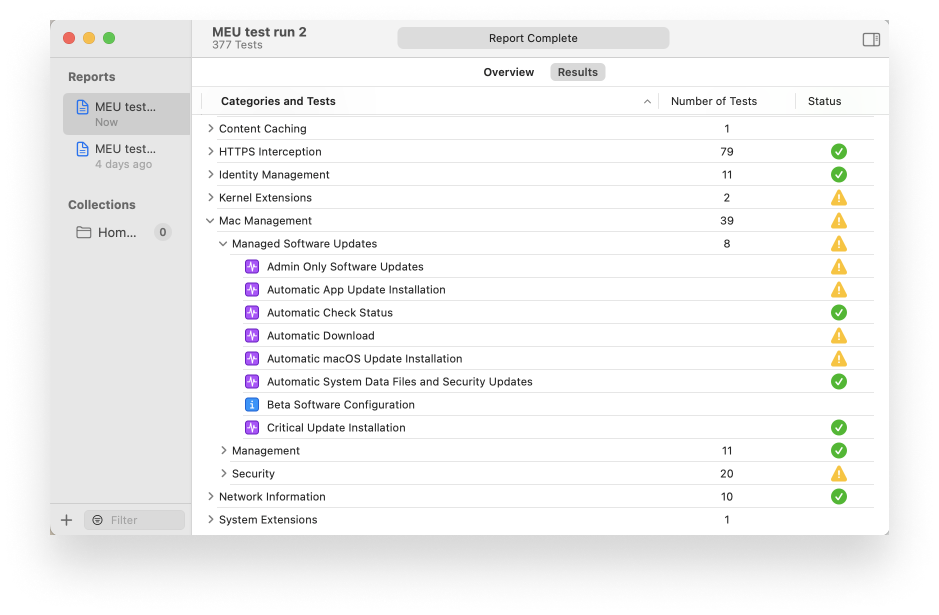
Then there’s a more detailed Results tab, showing the specific outcome of each test. Those results are broken into sections, from Application Information and Bonjour Services to Network Information and System Extensions. Click the disclosure triangle for any given section, and you’ll see all its individual tests.

Some of those results are just informational—name and model of the computer, its active SSID and IP address, whether the current user is a local or Active Directory account, and so on. Others are what MEU calls “evaluated,” meaning it checks the current state of the device and its environment for settings and configurations that can change more often—things like current network settings, the availability of services, or the validity of certificates.
Interpreting the MEU’s Results
For each result, MEU displays quick summary indicators: a green check mark for tests for which it found nothing questionable; a yellow warning sign for things it thinks are worth exploring; and red icons for anything it considers a blocker. If you do see one of those warning icons, that doesn’t necessarily mean something’s wrong: It just means you need to investigate.
For example, you might see a warning showing that you have non-universal binaries installed. It’s worth checking with the software developer, to see if they have an updated version of the app. But in the meantime, the software might function just fine, thanks to Apple’s seamless Rosetta implementation.
As an Apple practitioner, there are two categories in particular that you should pay attention to: Mac Management and (under Network Services) Push Notifications.
That Mac Management section offers many suggestions, such as ensuring that FileVault and Gatekeeper are enabled and Guest accounts disabled. Of course, you might want Guest accounts enabled in your environment, so be sure to compare those recommendations with your desired end state.
Push notifications, on the other hand, could cause you problems if they show warnings or errors. Blocking push notifications on your network can wreak major havoc and cause device management to work inconsistently or not at all. This is a very common finding in many environments that are just starting to roll out Apple devices.
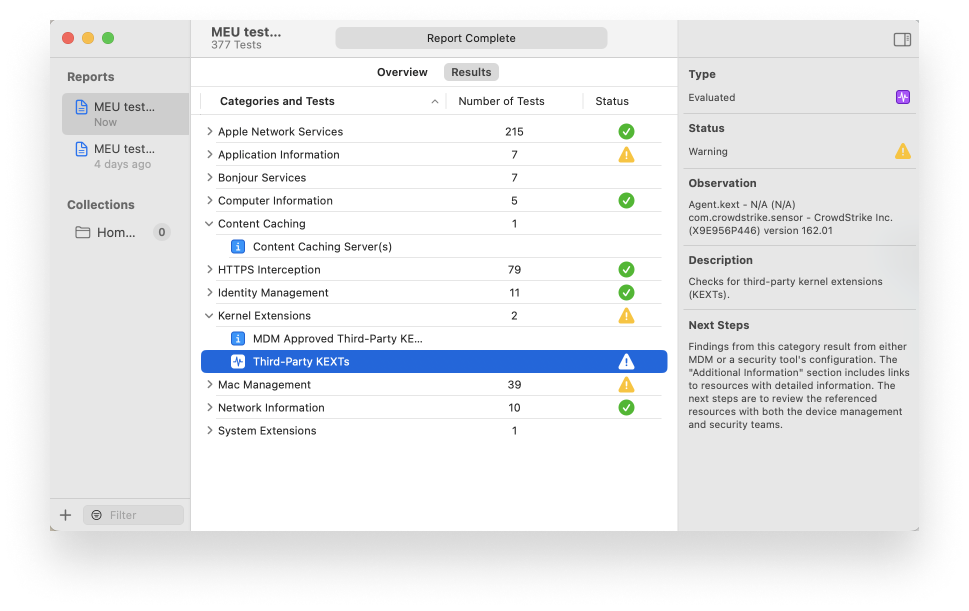
From the Results screen, click an individual result, and MEU will show you what it observed in a dashboard window on the right. Similarly to when you’re initially selecting individual tests, that dashboard displays the type of test that was run (informational or evaluated); the status of the result (those checkmarks and warnings); what the test observed; a description of the test itself; and some suggested next steps. Again, you want to take all of those results with a grain of salt. Things that MEU finds noteworthy may not be important to you.

Once you’ve run your report, it will automatically appear on the left side of the MEU window, along with previous tests. You can rename or delete a report from the File menu by right-clicking on it and choosing the appropriate option. You can also export it (as noted above, in PDF, JSON, or CSV formats) or move it into a collection for easier organization and later reference.
The Mac Evaluation Utility can give you a quick snapshot of the environment in which your Apple devices are operating, which makes it incredibly helpful for planning device deployments as well as troubleshooting for support. It’s free, it’s fast, and it’s indispensable for any Apple admin.
About Kandji
Kandji is the Apple device management and security platform that empowers secure and productive global work. With Kandji, Apple devices transform themselves into enterprise-ready endpoints, with all the right apps, settings, and security systems in place. Through advanced automation and thoughtful experiences, we’re bringing much-needed harmony to the way IT, InfoSec, and Apple device users work today and tomorrow.
See Kandji in Action
Experience Apple device management and security that actually gives you back your time.
See Kandji in Action
Experience Apple device management and security that actually gives you back your time.


